For this first session, you will have to deal with the Pan & Scan technique, EXIF data, and Xvid encoding.
Pan & Scan
Pan & Scan is a technique used to create a video from a single image. It is achieved by defining a frame, which represents the boundaries of the ouput images, and sliding that frame over the original image.
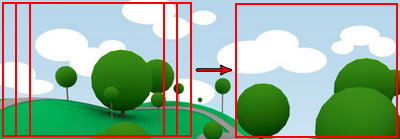
We've seen it many times in cartoons, the "camera" scans horizontally a landscape, such as the image above, and the result is what you can see below.

EXIF data
Exchangeable image file format (Exif) is a specification for the image file format used by digital cameras. It contains metadata tags, such as:
- Data and time
- Camera settings
- Thumbnails
- Geolocation
- Etc...
Xvid encoding
Xvid is a free video codec library following the MPEG-4 standard. By using the two-pass method, we can easily create a video with a specific size (can be useful if you want to maximize the quality but have size restrictions on the output file). Videos can be encoded using VirtualDub. Here is a tutorial.
Task
The task for this first session is to create your own video using the Pan & Scan technique. You will also have to overlay one EXIF tag from the original image onto the video (such as date and time in one corner). Finally, if the machines have the Xvid codec installed, you will have to encode your video.
This task is quite open, you can choose your own image (it must contain EXIF information), define your own camera motion, etc... Be creative. You will be using Matlab.
Guidelines:
- Get an image containing EXIF data (it can be your own or you can download one, on Flickr for instance, or here).
- Create a Matlab script/function that does the following:
- Define the size of the frames, the number of frame per second and the length of the video.
- Create a trajectory. It can be uniform, it can use a function (for ex. sin or cos), or it can follow checkpoints that you define by clicking on the image.
- Output a certain number of images that will be the different frames of your video.
- Overlay EXIF information on the frames.
- Output a AVI file.
- Use VirtualDub to encode your video using the Xvid coded
Note: Matlab basic knowledge is highly recommended to be able to follow the labs. You can find a tutorial here, and more information about efficient Matlab coding here and here.
Update:
Here are some tips that will help you have your avi file work properly (Matlab can get a little weird sometimes):
- Most of you used the command getFrame(gca) to retrieve the frame displayed in the current figure. Apparently Matlab adds an extra line/column of pixels to the actual frame. This will cause a problem, since when exporting your movie as avi, you have to make sure that both height and width of the frames are even numbers. To ensure that, you can convert your frame into an image by using the frame2im command, crop it to the desired (and even) height and width, and finally reconvert it back to a frame by using the im2frame command.
- Don't use VLC to play your avi file: use another player (like xine), or you may have some of the color channels inverted (the reason for that is still obscure).
- Concerning trajectories, the getline command might be useful...
- Encoding on Linux can be done using FFMPEG. Note: Xvid is not installed, but H.264 is.