Today you will learn how to write plugins for Nuke, in order to create custom nodes to perform various effects.
As the machines of the labs are on Windows, you will use Visual Studio to write your plugins. You can find a Mirror plugin example in the directory C:\Program Files\Nuke6.1v1\Documentation\NDK\vc8. You can start from this code, and modify it in order to perform the desired effects.
Before starting, here are a few tips:
Getting Visual Studio to build a plugin and place it so that Nuke can use it
- You can find documentation and example plugins in the Nuke directory on your machine (C:\Program Files\Nuke6.1v1\Documentation\NDK).
- In the .cpp file, change CLASS = "Mirror"; to CLASS = "Labs6";, or else Nuke will load the existing "Mirror" plugin, and NOT your code.
- In the Properties/Linker/General replace $(OutDir)\ExamplePlugin.dll with $(OutDir)\Labs6.dll
- In the Properties/Custom Build Step menu of Visual Studio, put $(OutDir)\Labs6.dll in the Outputs, and in the Command Line (note: replace GROUP with cs or cgvi depending on your group, and replace "brostow" with your username), put copy $(OutDir)\Labs6.dll "\\evs2\student-msc3\GROUP\2010\gbrostow\.nuke\Labs6.dll"
- Note: Once you've loaded the plugin once, that Nuke session is stuck with that built version of the plugin - you can't overwrite it, even if you try to recompile etc.
- Also, please always compile your plugin in debug mode, or else Nuke will crash when trying to load it.
- The main method that you will need to change is the engine method.
Using your plugin
- In Nuke, you can load the plugin by typing 'x' while over an empty part of the graph and typing "Labs6". That creates a new node which contains your plugin.
- Tick the premultiplied option in your image to have it behave correctly with your plugin.
Debugging a Nuke plugin using Visual Studio
- Copy over the .pdb file and rename it to match the .dll in the plugin directory.
- Tell Visual Studio -> Debug to Attatch to Process and choose Nuke
- Put a breakpoint in the code of your plugin at a meaningful place
- Every time the plugin gets called, the debugger can be used to inspect the variables and memory.
Once you are ready and you managed to compile and run the example plugin, you can start writing your own plugins.
Task 1: write a channel swapper plugin
Your first task is to write a plugin that swap the color channels (R<->G, G<->B, R<->B) of an image. You can use tick boxes in order to choose the type of swapping (an example is found in the mirror plugin).
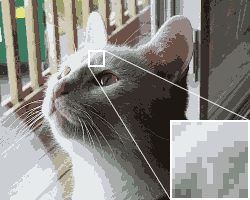
Task 2: write a quantisation plugin
The next task is to quantize an image, which means reducing the number of colors in the image. Once you choose a level of quantisation (for example 255 colors per channel being no quantisation and 8 colors per channel or less being heavy quantisation), you will start assiging each pixel to its closest quantised color. You could use a slider or an input field to choose the desired numbr of colours. An example of quantisation output can be see here:
Task 3: write a poor-man's Seam Carving plugin
The Seam Carving algorithm is used to resize images by removing paths of least importance (where the energy is minimum). It uses dynamic programming in order to calculate the best path to remove. For the last task, you will write a very simplified version of this algorithm, where you will remove on each line the pixel with the smallest energy (or gradient). You will use a node that accept two inputs: the first input is the image you want to resize, and the second input should be the gradient of the image, which you will use to find which pixel should be removed (an exaple of plugin that uses different inputs is the keymix plugin). Note that Nuke has a Laplacian node that can be use to calculate the gradient of the image. As it is relatively convenient to process scanlines in your plugin, we will limit ourselves to shortening the width of the image only. You can have a slider to indicate how many pixels you want to remove, and you can fill the rest with black pixels in order to keep the size of the image intact.