Common cameras can only capture a limited range of intensities, and usually map them to a value between 0 and 255. However, in the real world, there is no such limitation, and looking directly at the sun can be million times as bright as looking at a dark corner of a room. Therefore, photos cannot accurately represent the real brightness of a scene, especially if it displays very dark and very bright parts at the same time. High Dynamic Range Imaging (HDR) is a technique that allows a greater dynamic range of luminance between the lightest and darkest areas of an image.
This practical is divided in two parts: first you will have to create an HDR image from a stack of normal low dynamic range (LDR) photos, and then map the whole resulting HDR image's intensity to an LDR image in order to be able to display it on your screen, which has a limited range. This second step is called tone mapping.
Creating an HDR image
A widely used technique to create an HDR photo is to process a stack of photos of the scene captured with different exposure levels. Usually the photos are taken using a tripod, in order to avoid any motion of the camera. Some cameras have an Automatic Exposure Bracketing (AEB) mode which takes a series of photos with varying exposure. You are encouraged to use your own photos if you have some available.
Let's see what bracketed photos look like:

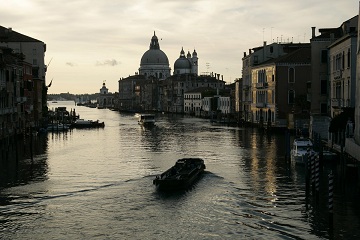
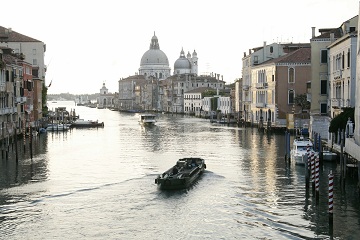
Each photo captures some details that the other ones can't. For example the darkest photo displays a well exposed view of the sky, whereas the brightest photos has a better view of the boat or the buildings. Combining those three photos together will give us an HDR image. We will use HDRShop (v1 is free) on Windows and Photosphere on Linux and Mac (you will have to download them). Follow the tutorials and examples to create your .hdr image
Tone mapping
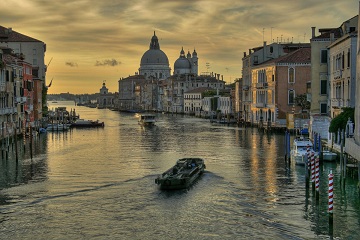
Tone mapping an image will create LDR values that can be displayed on your screen. Many different tone mapping techniques exist, and one possible output is the following picture:
The next task is to to tone map your HDR image into an LDR image using two different techniques.
- First, you will split the .hdr into a base image and a detail image. You can implement the pseudo code available at the end of this page (from Durand & Dorsey 2002), but use a Gaussian filter instead of a Bilateral filter.
- Then, you can repeat the previous step, but you will implement the Bilateral filter.
Once you have done those two steps, it can be interesting to compare the resulting images for each method.
Algorithms
Durand & Dorsey 2002
input intensity= 1/61*(R*20+G*40+B)
r=R/(input intensity), g=G/input intensity, B=B/input intensity
log(base)=Bilateral(log(input intensity))
log(detail)=log(input intensity)-log(base)
compressfactor=log(output range)/(max(log(base))-min(log(base)));
log_offset=-max(log(base))*compressfactor;
log (output intensity)= log(base)*compressionfactor+log_offset+log(detail)
R output = r*exp(log(output intensity)), etc.
Bilateral filter
The Bilateral filter blurs an image except across strong edges. For each pixel, the output is a weighted average of the neighboring pixels where the weight depends on both the spatial distance and the intensity difference:

where k(s) is a normalization term:

Ns is the neighborhood of s, s and p are both coordinates of the image lattice. There are three parameters for bilateral filtering: the half size neighborhood w (the neighborhood is (2w+1)x(2w+1)), the spatial standard deviation sigma_d and range standard deviation sigma_r.
Material
- A set of bracketed images is available here. Feel free to use your own photos.
- Matlab provides a function, hdrread, to read an .hdr image. However, only the newest versions of Matlab can do that. All the Matlab folders are located in the /opt directory, so to run the latest version you can try to run /opt/matlabR2009a/bin/matlab . Once in Matlab, if you have problems to browse to your home directory, open a terminal, and do pwd, this will give you the complete path.
Credits
The photos used were taken from http://www.hdrsoft.com/. Some parts of this labs have been taken from Fredo Durand's Computational Photography problem sets.