The goal of this practical is to design and create an algorithm that can be used to restore old films. This is assessed and the deadline is set to February 22nd at noon.
In their lifetime, films may suffer deterioration due to environmental hazards such as humidity and dust, chemical instabilities and improper storage. They can also get damaged during development and processing. This leads to flicker, camera shaking, blotches, scratches and other artefacts. Old archive footage, such as film of the 1900's, presents those defects: you will have to find ways to correct them. We will deal with four kinds of features visible on films. Each of them constitutes a part in the coursework.
Detection of scene cuts (10%)
The first part of the coursework consists in detecting scene cuts, which are not defects of the film, but we'll say it's the warm-up and it might also help you for the following sections. By scene cuts we mean moments when the scene changes. They will simply appear as hard transitions since old films don't display fancy effects to switch from a scene to another. In your output video, you will have to overlay text on the image that will inform the viewer that a scene cut occured.
Correction of global flicker (20%)
Intensity flicker is a common artefact in old films. It is a unnatural temporal fluctuation in perceived image intensity that does not originate from the original scene. In other words, the image will appear suddenly darker/brighter and won't have a constant global luminosity over time. Intensity flicker can be caused by dust, chemical processing, aging of film, copying, and in the case or earlier film cameras, variations in shutter time. To illustrate, we'll have a look at the following consecutive pictures of a film:
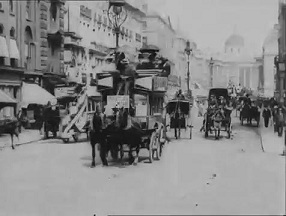
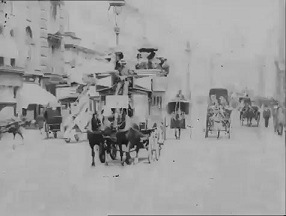
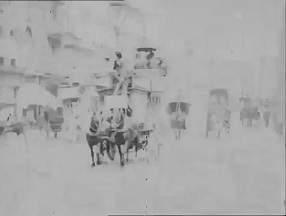
It might sometimes not be obvious by looking at still shots, but you will understand better when looking at actual footage. In those three consecutive shots, the image gets suddenly brighter. In your output video, you will have to suppress intensity flicker as much as you can.
Correction of camera shaking (35%)
This is quite self-explanatory: the image just seems to shake. You will have to align the frames together in order to remove that unwanted motion. Your output video should be comparatively shake-free.
Correction of blotches (35%)
Blotches are a common type of artefact that manifests itself as disturbing bright or dark spots caused by dirt and by the loss of the gelatin covering the film, due to aging effects and bad film quality. Let's have a look:
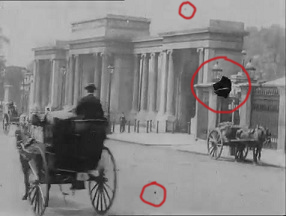
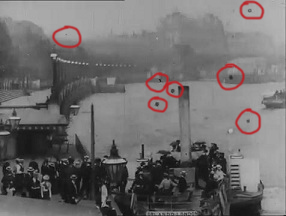
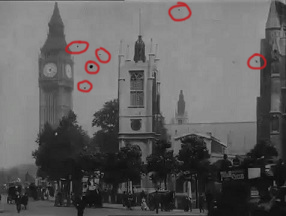
Here I pointed out the most noticeable ones, but there are many more and it is more obvious once more when looking at the movie. You will have to detect those blotches and remove then. That implies inpainting the part of the image that the blotches were covering, or in other words fill the holes. Your output video should be ideally blotch-free.
Details
- You are provided with a set of different films. You will pick one, or a part of one, and process it with your algorithms. The part that you pick should display all the four features specified above.
- You will have to hand in the processed video and also your code. An upload section will be available on the course website. The size limit is set to 50MB per student. If you want to show your results in more details, (eg. side by side comparison), you will be able to specify the address of your website.
- You may draw on any resources available (except fellow students), search on google, read papers, get inspired from the current state of research in this field. This doesn't mean that you are allowed to copy and paste existing algorithms, we want to see your personal work and your explanation of how each part of your algorithm works step by step.
- Up to 50% of the code can be from elsewhere, but you have to cite your sources.
- Your code will have to respect the interface that we provide (we must be able be able to run labs3('mypath/to/images/') on any folder containing a sequence of images). This way we can test your algorithms on more videos after you hand it in.
- You are provided with two handy functions that allow you to easily read a sequence of images from a folder, and save your corrected images. You will find them useful especially if your machine has a limited amount of memory (you can use the functions to load a part of the movie, unload it and carry on: no need to load the whole video). To be able to use them, you must first convert your video into a sequence of images, this will be explained in the next section.
Convert a video into a sequence of images
As mentionned before, you will have to convert your chosen video into a sequence of images, eg. footage.avi into a sequence from footage_0000.png to footage_0150.png. It is advised to extract png images, and not jpeg, to avoid further compression.
On Windows
It is slightly complicated to achieve that on Windows, we advise you to do it on a Linux labs machine or use that to open a linux session. However if you feel that you can handle it you can do the following on your (personal) computer:
- Get the 32bits version of those sofware:
- Latest ffdshow (http://sourceforge.net/projects/ffdshow-tryout/files/)
- Haali Media Splitter (http://haali.su/mkv/)
- Media Player Classic (http://www.free-codecs.com/download_soft.php?d=4253&s=134)
- Open ffdshow video configuration and in the codec section, make sure that H.264 is set to libavicodec.
- Decoder Options and untick both "Drop frame on delay" and "Skip H264 deblocking on delay".
- Go to the "Grab" options, tick Grab, and set your options there. Dont forget to put Quality to 100 and Image format to PNG.
- Now the next time you will play a video with Media Player Classic, it will export the frames in the folder you indicated before.
- Don't forget to untick "Grab" after you exported the images.
On Linux
It is much simpler:
- Using ffmpeg, eg.: "ffmpeg -i footage.mp4 -ss 00:00:10 -t 5 footage_%4d.png" will export frames from footage.mp4, starting at 00:00:10, for 5 seconds, and will name the frames footage_0001.jpg, footage_0002.jpg, etc.
As mentionned before, if you are a Windows user and you want to work on linux, you can go to https://sgd2.cs.ucl.ac.uk/sgd and open a new gnome session using your CS login/passwd (Matlab seems to have problem with KDE). Let me know of any problem.
Material
- You can find the films and the matlab code here.
- The film footage4.mp4 is harder to correct than the others since it's more damaged. You can test your algorithm on it if you want to test its robustness.
- The file you will have to fill in is labs3.m
- You can use the two functions load_sequence and save_sequence to load and save a sequence of images.
- Some papers on the topic are provided in the same folder. Keep in mind that that they are far too complex and that they are just shown to get you inspired. It should be possible to solve this assignment which simpler techniques, even if not necessarily at the same level of quality.
Update
- To create an output video, you are advised not to use Matlab because it behaves weirdly. You can use the save_sequence function to save your output as a sequence of images and then use ffmpeg to create a movie from them. For example: ffmpeg -r 25 -i corrected_image%4d.jpg corrected.mp4 (-r 25 stands for 25 frames per second). Look at ffmpeg help or google for more info on that.